If you're like most business owners, you're always looking for new and better ways to market your products or services.
What if you could build your list and make offers, completely on autopilot? 10XPRO's John Lint is here to show you how, in a matter of clicks, you can set up an automated sales machine that will do all that for you. All it takes is one of the many sales funnel templates inside 10XPRO.
Podcast: Download (Duration: 19:34 — 18.0MB)
Get Notified Of Future Episodes Apple Podcasts | Spotify | Amazon Music | Android | Blubrry | Gaana | TuneIn | Deezer | Anghami | RSS | More
Episode highlights:
02:12 – This is how the campaign is structured. See how it all fits together, at a glance.
04:15 – The pages that make up the machine. It’s not as complex as you might expect.
06:25 – How the email part works. This is how you keep your prospect in the loop.
07:27 – What the timer does. Inject that bit of urgency into your campaign.
10:59 – Setting it up is the easy part. No linking, no coding required.
12:05 – How you configure the deadline. Everyone gets the right amount of time to respond.
13:14 – Let’s check out the pages. Everything linked, everything customizable.
15:55 – And now it works on its own. You’ve set it up, now let it run.
17:52 – What you’ve got, in summary. Does it get any easier?
Power up your marketing strategy with help from James
What’s better than making sales online? Letting an automated campaign do it for you. And when that campaign is uncomplicated and easy to set up, it’s a double win.
John Lint is back at James’s behest to break down an automated sale campaign into its parts, and then show how simply it can be set up in 10XPRO.
The pages that make up the machine
If you’ve kept up with this series, you can look at John’s sales funnel template and see a mix of the live sale campaign and the list builder campaign that he talked about in previous episodes.
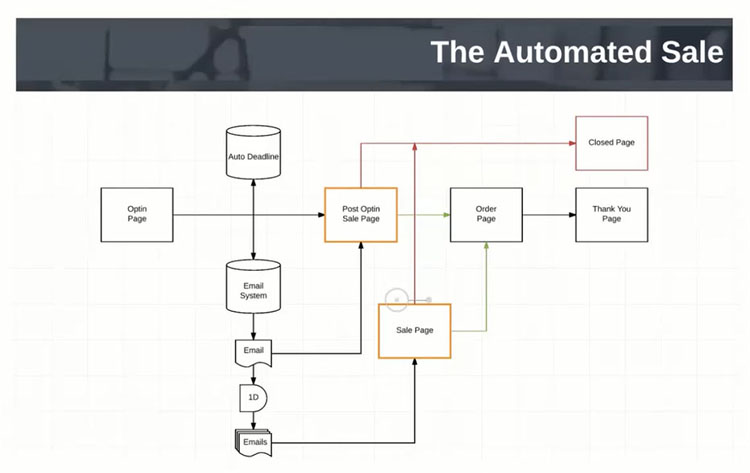
The automated sale campaign is made up of four main pages, and then two extra pages.
The main pages are as follows:
1. Opt-in page – This is where you invite people to join your email list in exchange for something valuable. That something might be a report, cheat sheet, a blueprint, a video – something that’s going to solve one specific problem, using one specific solution.
“Offer your target market something that will solve one specific problem, that will give them one specific solution.”
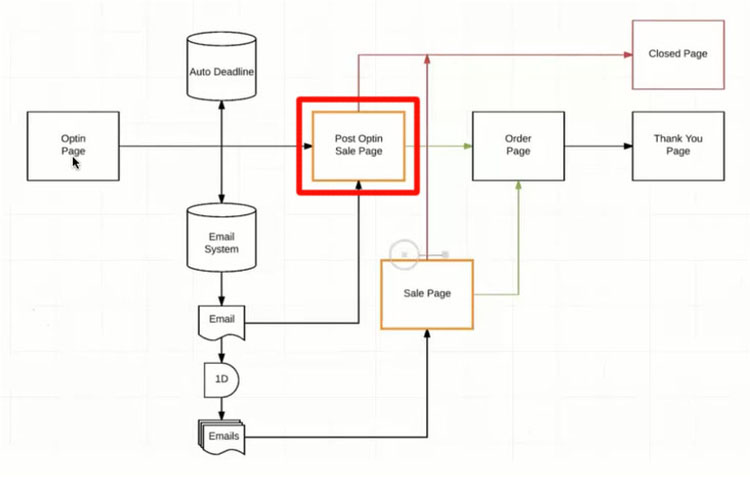
2. Post opt-in sale page – Opting in takes people to this next page, where they are told, Awesome. The thing I promised you is on its way. In the meantime, check out this video where I show you some extra stuff. This is obviously related to what they opted in for, so if they opted in for five steps to bigger muscles, the video on this page might offer a quick hack to pump up your biceps.
Basically, it’s a sales video, but one that’s value-based – you teach, you provide a ton of value, And then at the end, you tell them more about your product.
At the end of the video, Hey, if you liked this, you’re going to love my course, or my membership program, check it out, here are the details. Then, of course, they can click on the button that will appear.
3. Order page – This is where the order button will take them, where they can now submit their payment details. They submit their order, and this lands them on the…
4. Thank you page.
You can build this campaign bigger, says John, by adding upsells and downsells, all of which are built into 10XPRO. But at its very simplest, the campaign is made up of the above four pages.
How the email part works
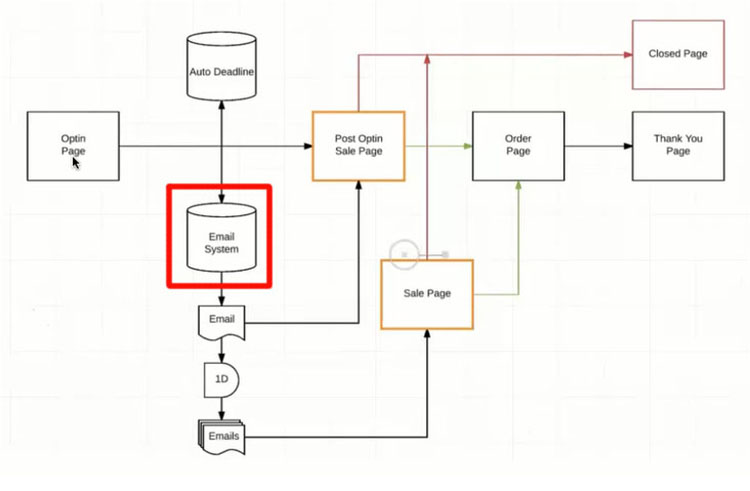
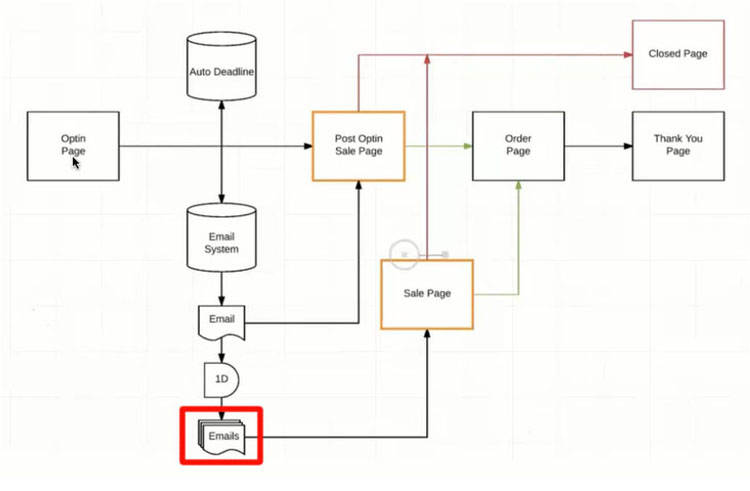
Now, says John, two very important things have to happen. First, when someone opts in, you send them to your emailing system. This is crucial, because then you can follow up with them. And because you have now an automated campaign, you can follow up with them to remind them about your special offer.
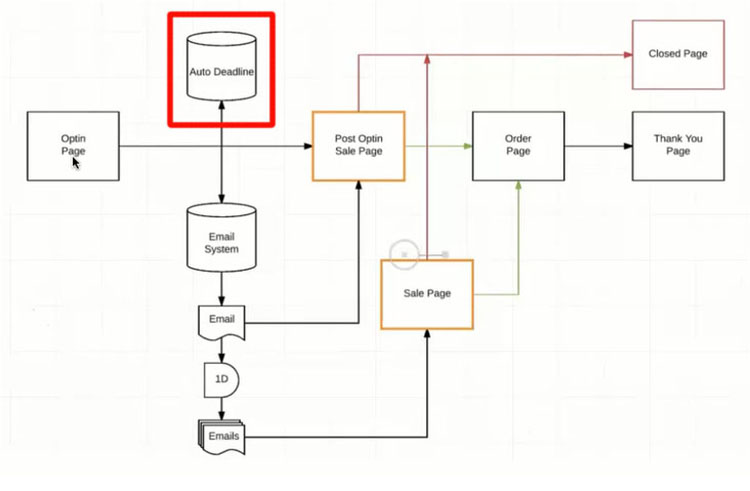
The second thing is, when someone opts in, we register them to what’s called an automated deadline. That means the user who opts in will have a deadline calculated on the fly at the moment of opt in, and it will be set on the website for the user. So now the website knows who they are and what their deadline is.
Your first email will be along the lines of, Hey, here’s the PDF that I promised you, here’s the link to download. And then, because you’re making an offer, you might have some text reminding them, Hey, by the way, the special offer that I told you about is going to be available until this day at that time. And it’s all automated. Of course, you can have an email timer as well, right there on that email.
What the timer does
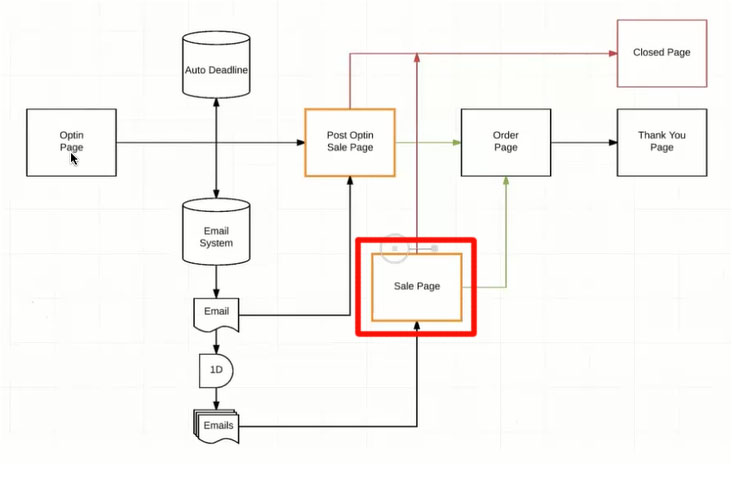
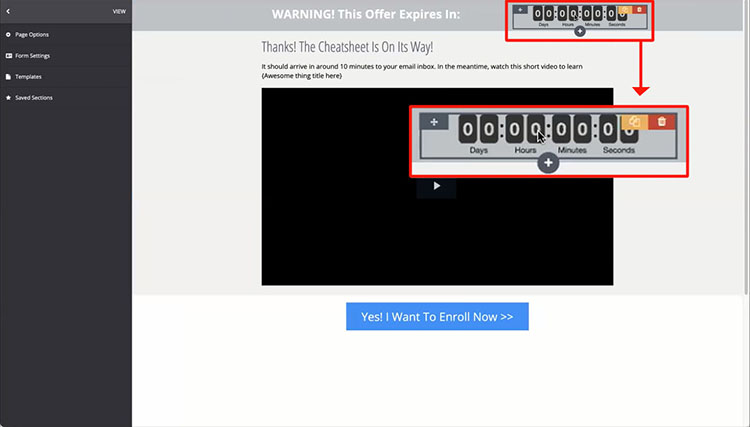
So now they can click to go to this page. And you can see that this page has an orange border, because this is a dynamic page. It’s not a page that anyone can access. People can’t just share the URL and go to that page. Before someone can land, the system will check, are they registered to that deadline? Yes or no?
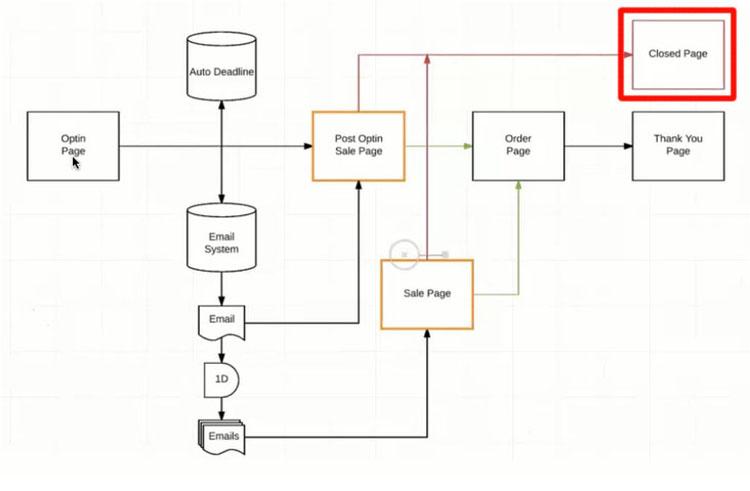
If not, they get redirected to the closed page. If yes, they can land, and the timer on that page will be dynamic to them. Of course, once the timer reaches zero, they can’t go to that page anymore, they will be automatically redirected to the closed page.
Now if you’re doing, as in this example, a two-day campaign, then the next day, you’ll want to remind them that it’s the last day. So one day after the first email, you could send two emails. One in the morning, letting them know that it’s going to expire tonight. One later that day, saying, Hey, there’s only a few hours left. No hype, just letting them know the facts.
And the reason why they’re getting this special offer is because they just joined your list. So in your emails, as part of your copy, you might say, I’m doing this as a thank you for you joining my newsletter / my waiting list / my subscribers’ list, and it’s a great way for you to get these bonuses.
Now if they click on your link, they go to this extra page, which basically recaps the offer. And it’s protected by the same timer, so if their time has not run out, they can land. If it’s past the deadline, they reach the closed page.
Setting it up is the easy part
That’s the overview. Now, setting it up is easy with 10XPRO’s sales funnel builder, as John will demonstrate. He’s given the strategy, so you understand what’s needed:
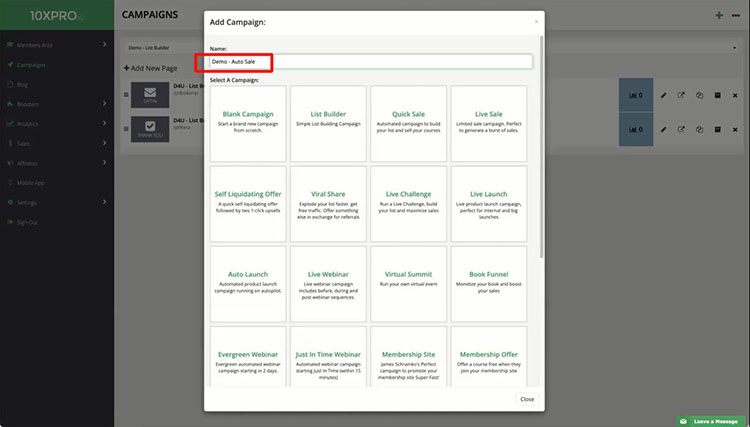
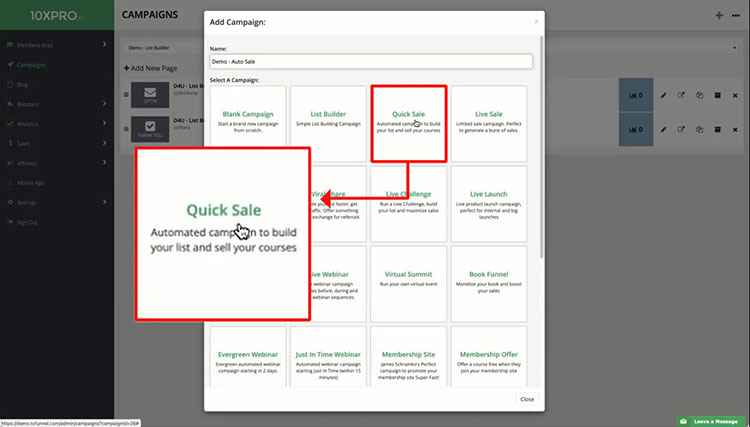
In 10XPRO, you go to Campaigns, and click on the plus sign.
You’ll get a dropdown, where you give your campaign a name. Here John calls it Demo Auto Sale.
Then he picks the Quick Sale campaign, which is a quick way to make an automated campaign to build your list and sell your courses.
And just like that, all the pages you need are set up.
How you configure the deadline
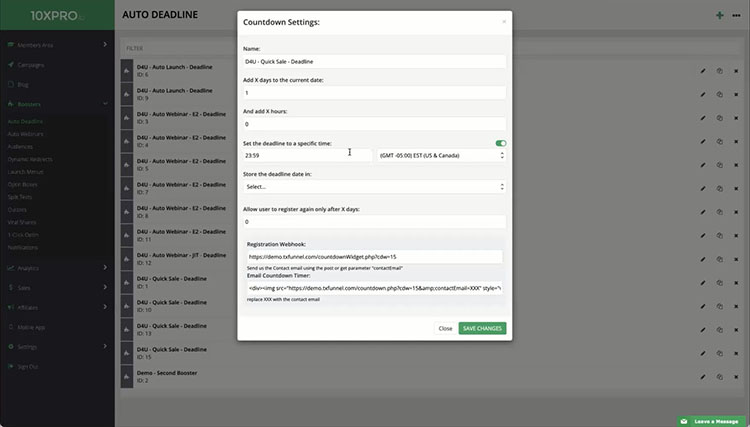
John draws attention to a small puzzle icon. That is the automated deadline widget that is built in. He clicks on it, and now you can set it up.
So in this case, when someone registers, we add one day, and zero hours. Then we set the deadline at 11:59 for this time zone. Now the system will calculate a deadline based on the registration time, and this information will be saved on the website.
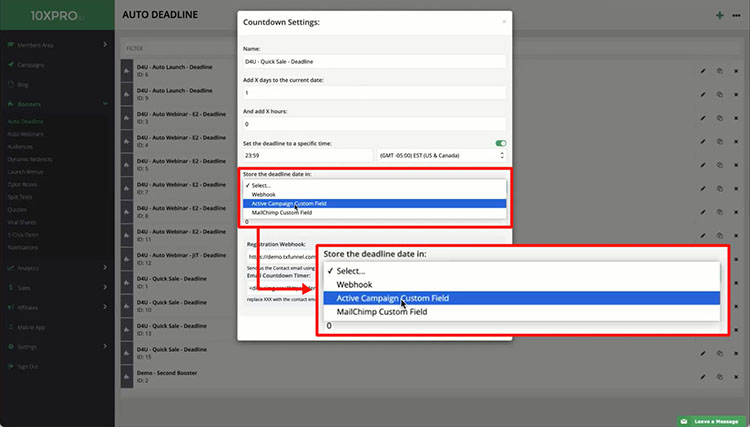
It can also be sent to your emailing system, so you can then have that date in your email messages. You just click a dropdown and select where you want the deadline saved.
This is powerful, because then you can customize your messages as they go through the campaign. You can say, Hey, the offer is going to expire tomorrow, or it’s going to expire on Thursday at that time. And that date is dynamic, just like the email timer dimension.
Let’s check out the pages
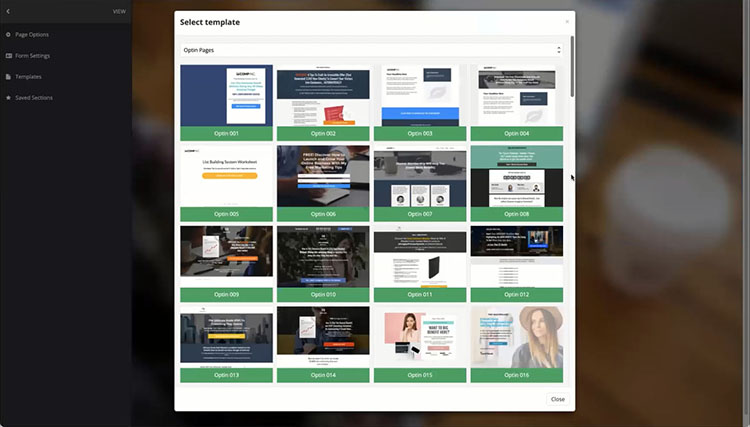
If we look at the pages, for the opt-in page here, you’ll see there are plenty of landing page templates to select from and customize.
People opt in, they go to the sale page that has the deadline timer. It tells them their cheat sheet, or what have you, is on the way, watch the video for this cool other tip.
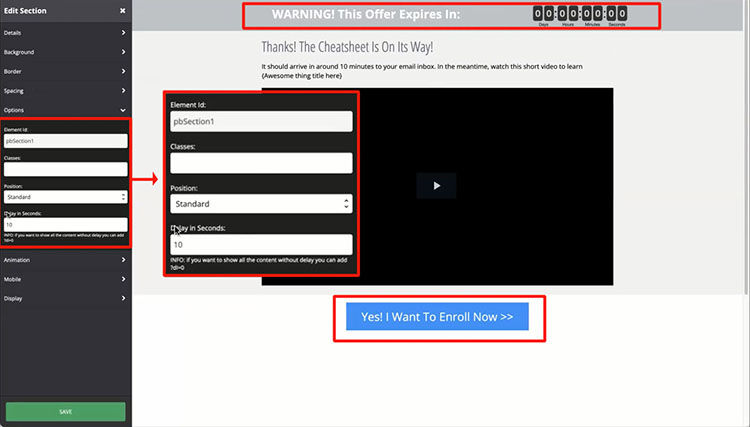
Now the top and bottom sections of the page can be set to appear after a delay, say after you’ve shared your cool trick in the video and have transitioned to, If you enjoyed that tip and want 10 other tips, check out my course / membership program where we go deep into getting those results. Let me tell you about it. At that point, the offer expiry, timer and enrollment button will appear.
It’s just a matter of indicating how long you want the delay. You don’t have to struggle with plugins, scripts, and extra systems, it’s all built in.
“You don’t have to struggle with plugins, scripts, and extra systems, it’s all built in to 10XPRO.”
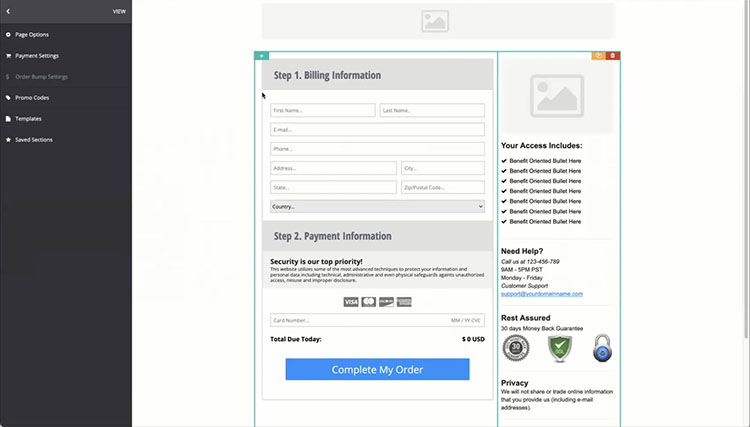
If they choose to enroll, they land on the order page. And this can be as fancy as you want. What matters is, you’re accepting payments.
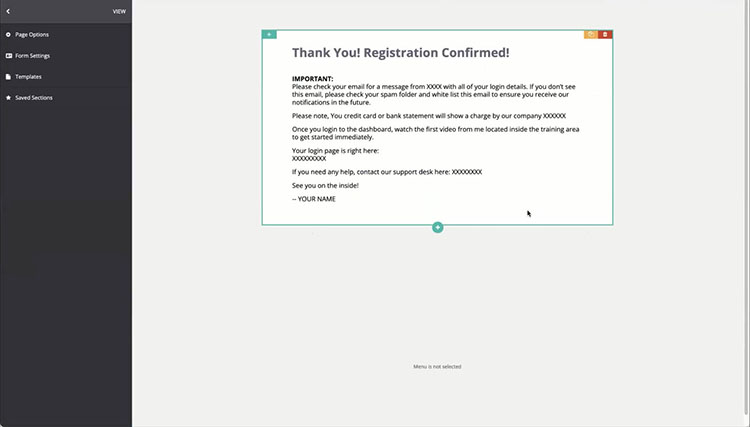
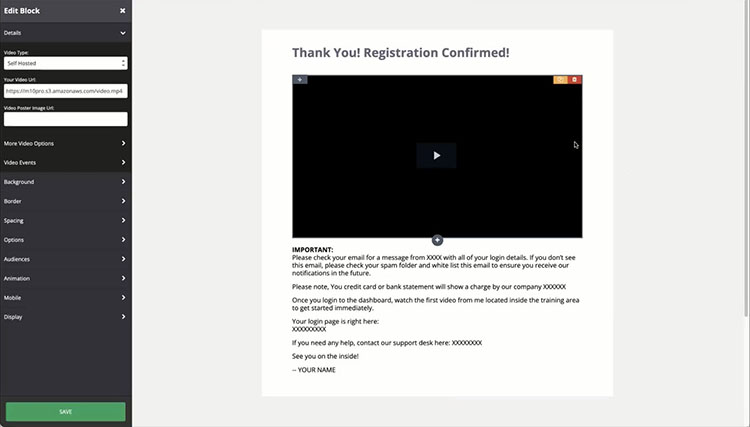
Then the thank you page recaps what will happen next: get an email, you can log in here.
You can customize it any way you choose. To add a video for instance, just choose it from the left panel, and boom.
That’s the funnel.
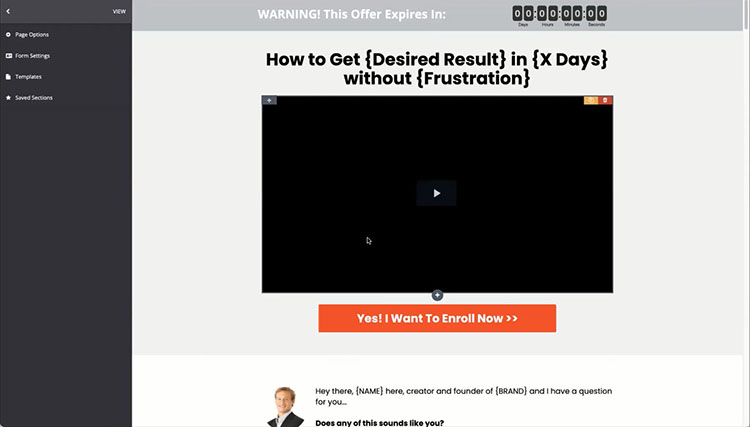
The next part is, of course, the email reminders, and sending them to that extra page, which is also built in, and can be more a sales page. You can see here now, it talks about the desired result, it has the timer on top, it can be a video sales letter if you want. Otherwise, it’s basically a sales letter. Bottom line, you’re making an offer. If they click, they go to the order page, if they buy, they go to the thank you page.
If at any point someone tries to reach a page, and they don’t have access to it, they’ll reach the closed page. And remember, if they try to go to this extra page after the deadline has expired, the system will also redirect them to the closed page.
And now it works on its own
All of that, once you set it up, works 100 percent on autopilot.
So now you’re building your list. You can share the opt-in page on your blog or in social media ads. As soon as people opt in, you’re making them an offer.
Later, says John, if you have other offers, you can add more campaigns. This is something he calls Cascading Profits, where you’ll always have different campaigns, different contingency plans. If people say no here, that’s okay – we can put them into any of the other campaigns.
What you’ve got, in summary
James loves it. This is an automated sales machine that will capture email addresses and make offers, and it works on autopilot. The bits you need to make it work are optional. You can have your 10XPRO installation working from your own domain name, but you don’t need hosting or anything. 10XPRO does all of that for you.
All the ingredients you need are an email system, somewhere to send the money, whether PayPal or Stripe, and 10XPRO. And of course, you’ll need something to sell.
If you want to try out the all-in-on campaign features of 10XPRO, look up John and his team at 10XPRO.io.
Access the wealth of business resources inside JamesSchramko membership
Liked the show? Leave us a review on iTunes





Leave a Reply